Tutorial
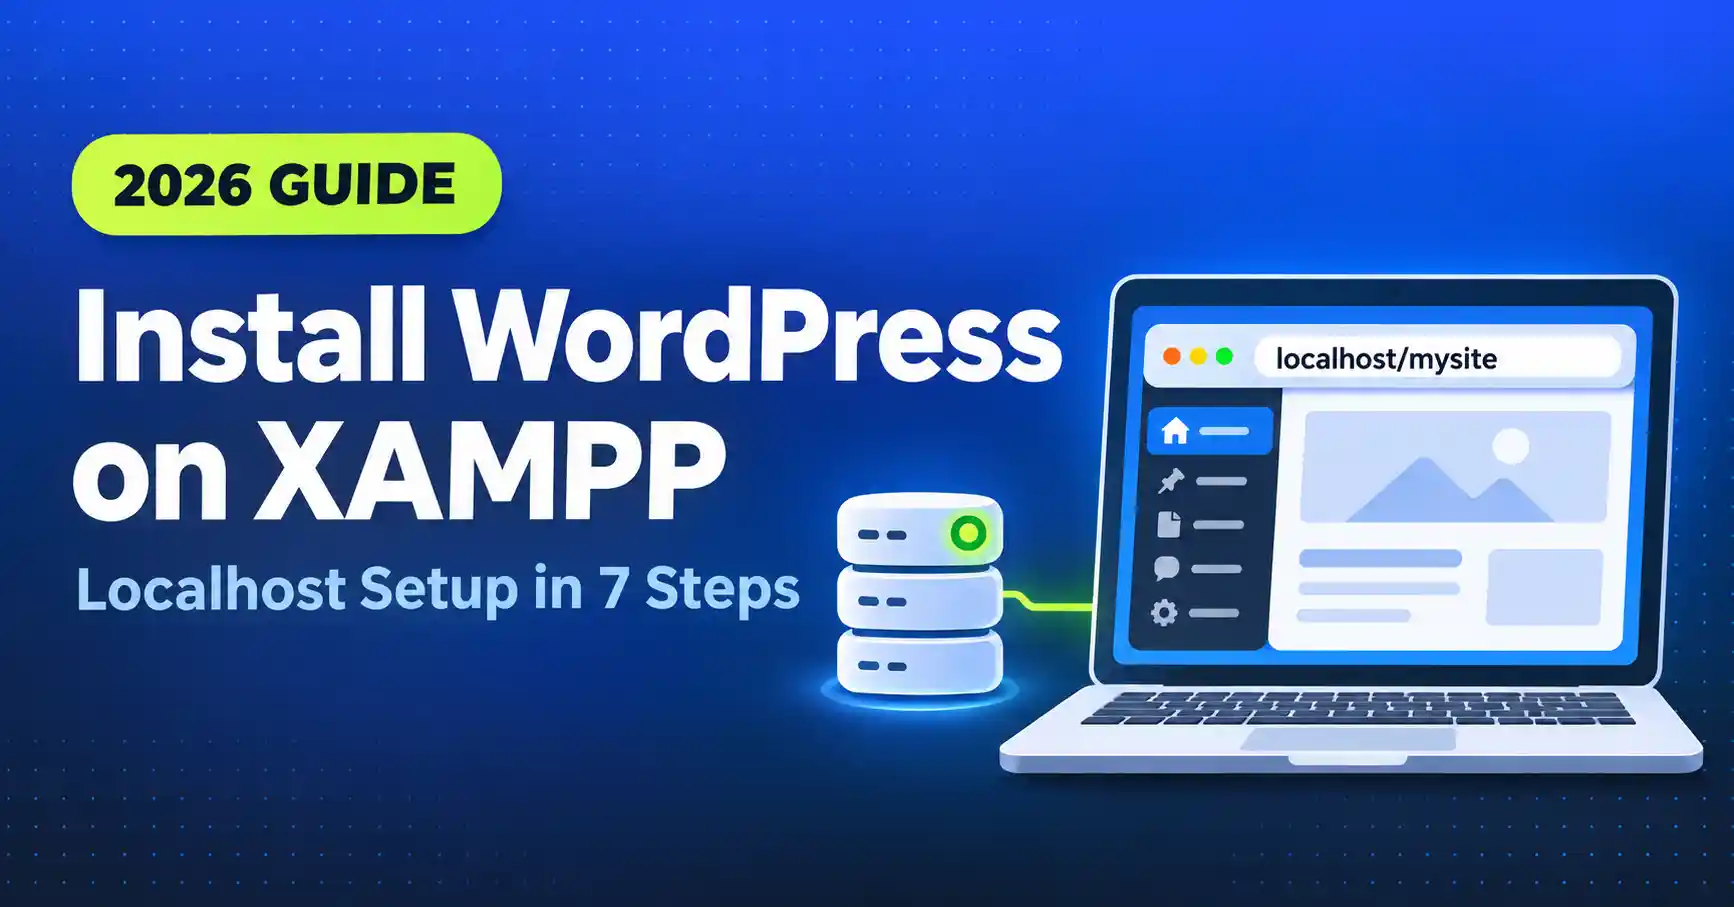
How to Install WordPress on XAMPP (Localhost) in 2026
⚡ Quick Answer
To install WordPress on XAMPP, start Apache and MySQL, extract the WordPress .zip into C:\xampp\htdocs\mysite, and create an empty database in phpMyAdmin. Then open http://localhost/mysite and enter the database name, the username root, a blank password, and the host localhost. Finish the site setup form and log in at /wp-admin. The whole process takes about 5–10 minutes.
| 📋 What you'll need | Details |
|---|---|
| XAMPP | Installed, with Apache and MySQL both running (green) in the Control Panel. Not installed yet? Follow our XAMPP for Windows installation guide. |
| WordPress | The latest .zip from wordpress.org (about to download in Step 2). |
| PHP version | WordPress needs PHP 7.4 at minimum. WordPress.org's hosting handbook recommends PHP 8.4 or 8.5 for new installs, so check your XAMPP build with phpinfo(). |
| Tools | Any browser. Windows can extract .zip files without extra software. |
| Time | About 5–10 minutes. |
Running WordPress locally lets you test themes, try plugins, and build a site without paying for hosting or risking a live website. This guide takes you from a working XAMPP setup to a WordPress site running at http://localhost/mysite, using the current WordPress release. It covers the database setup, an explanation of every installer field, a manual wp-config.php fallback, and fixes for the errors beginners hit most often.
Before you start
If Apache or MySQL will not turn green, fix that first with our guide to 9 common XAMPP errors on Windows. If you moved Apache to port 8080, add :8080 to every URL in this guide, for example http://localhost:8080/mysite.
PHP 8.2 reaches end of life on December 31, 2026
WordPress still runs on it, but a fresh XAMPP install shipping PHP 8.2 is worth upgrading. See how to upgrade XAMPP to PHP 8.5 on Windows.
Why Run WordPress Locally?
- Test plugins safely. A broken plugin on localhost cannot take down a live site.
- Develop themes and child themes without uploading files after every change.
- Learn WordPress by experimenting freely, with no cost and nothing to lose.
- Work offline once WordPress and your plugins are downloaded.
- Skip hosting costs while you prototype.
The trade-off: a local site is visible only on your computer. It is a workshop, not a replacement for a live environment.
Step 1: Start Apache and MySQL
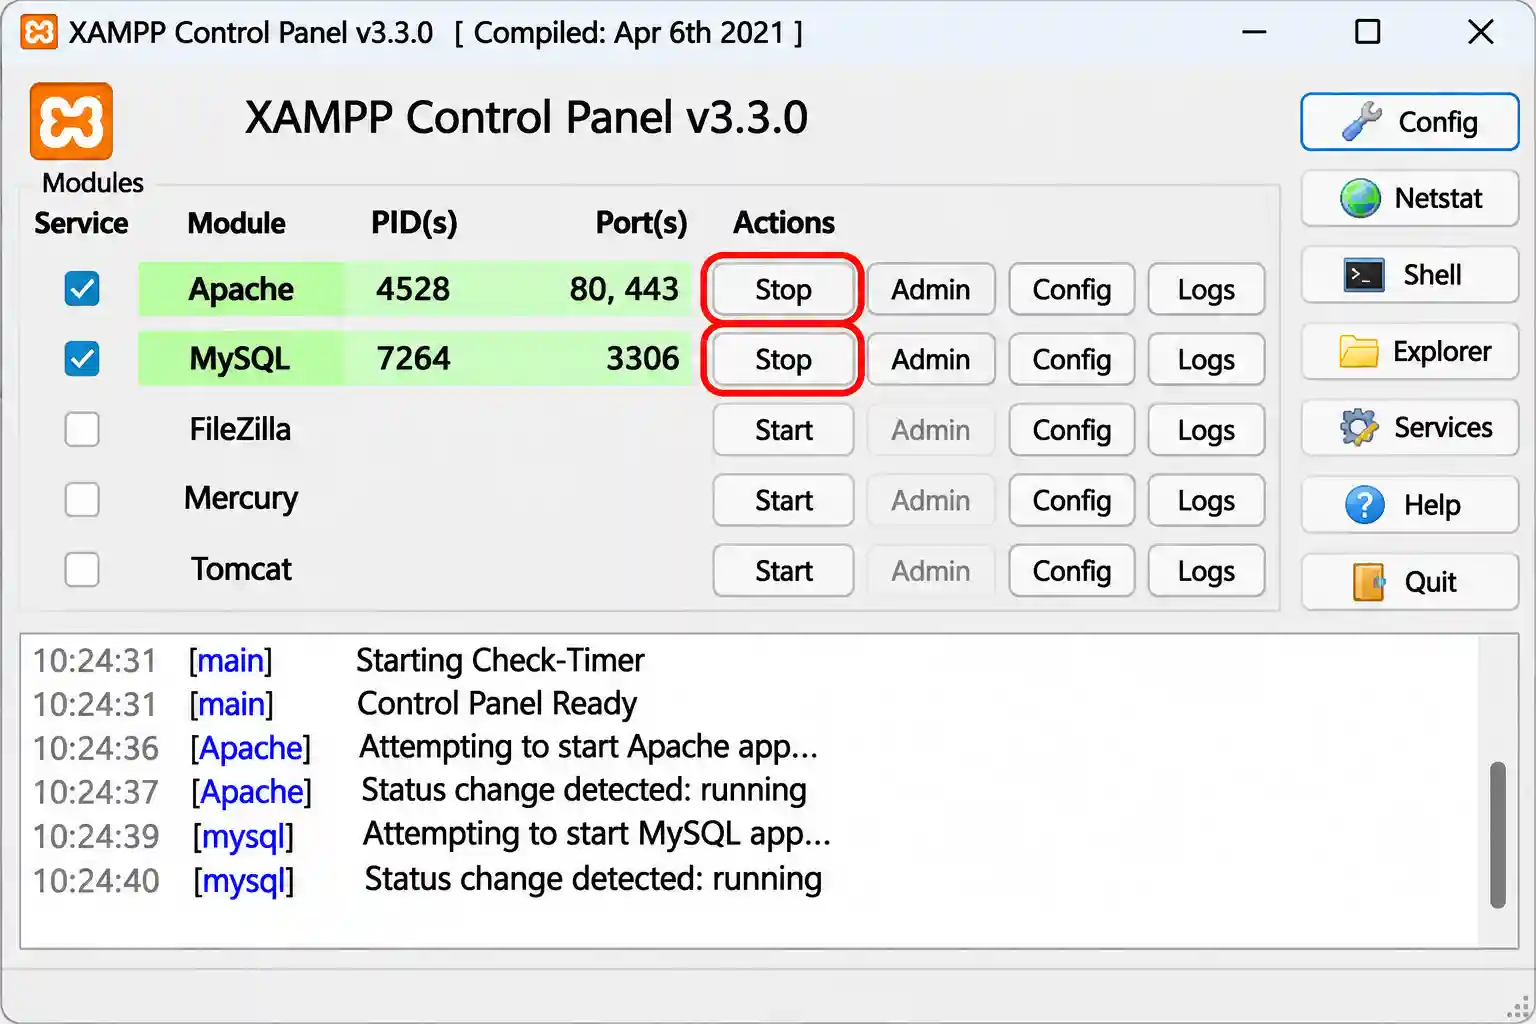
Open the XAMPP Control Panel and click Start next to Apache and MySQL. Both rows should turn green and show a process ID and port numbers (usually 80 and 443 for Apache, 3306 for MySQL). WordPress needs both: Apache serves the pages and MySQL stores your content.
Step 2: Download WordPress
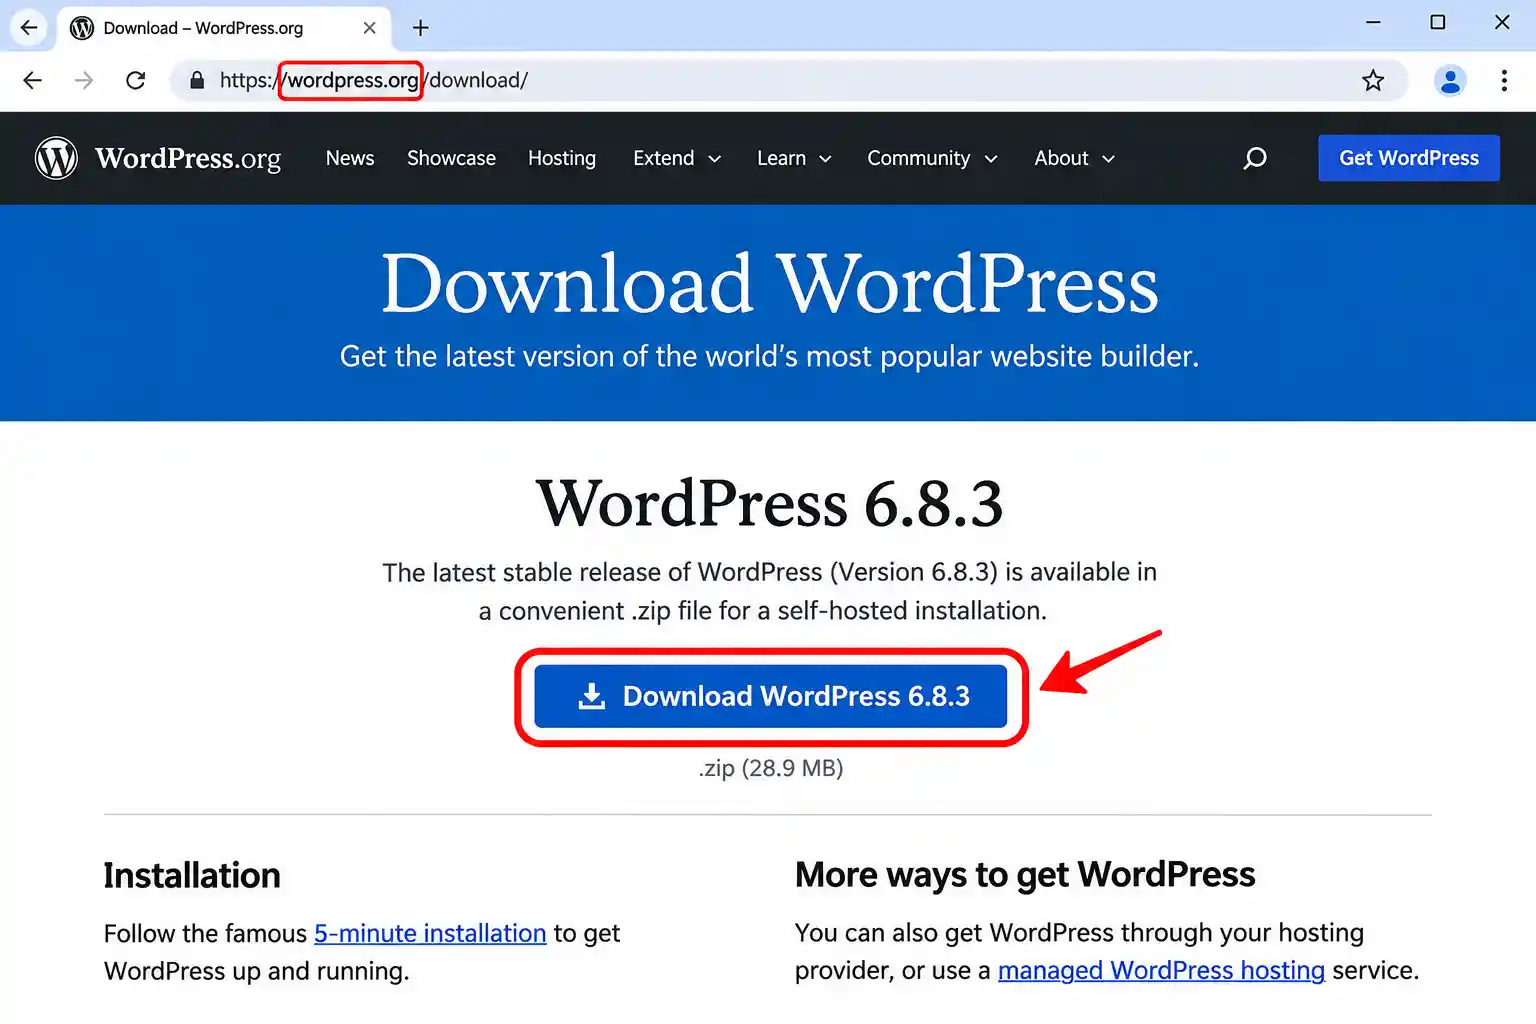
Go to wordpress.org/download and download the latest .zip file. Save it anywhere you can find it, such as your Downloads folder.
Download only from wordpress.org
Avoid "nulled" copies and unofficial mirrors. Modified WordPress packages are a common way to hide malware, and a local install is not immune to it.
Step 3: Extract WordPress to the htdocs Folder
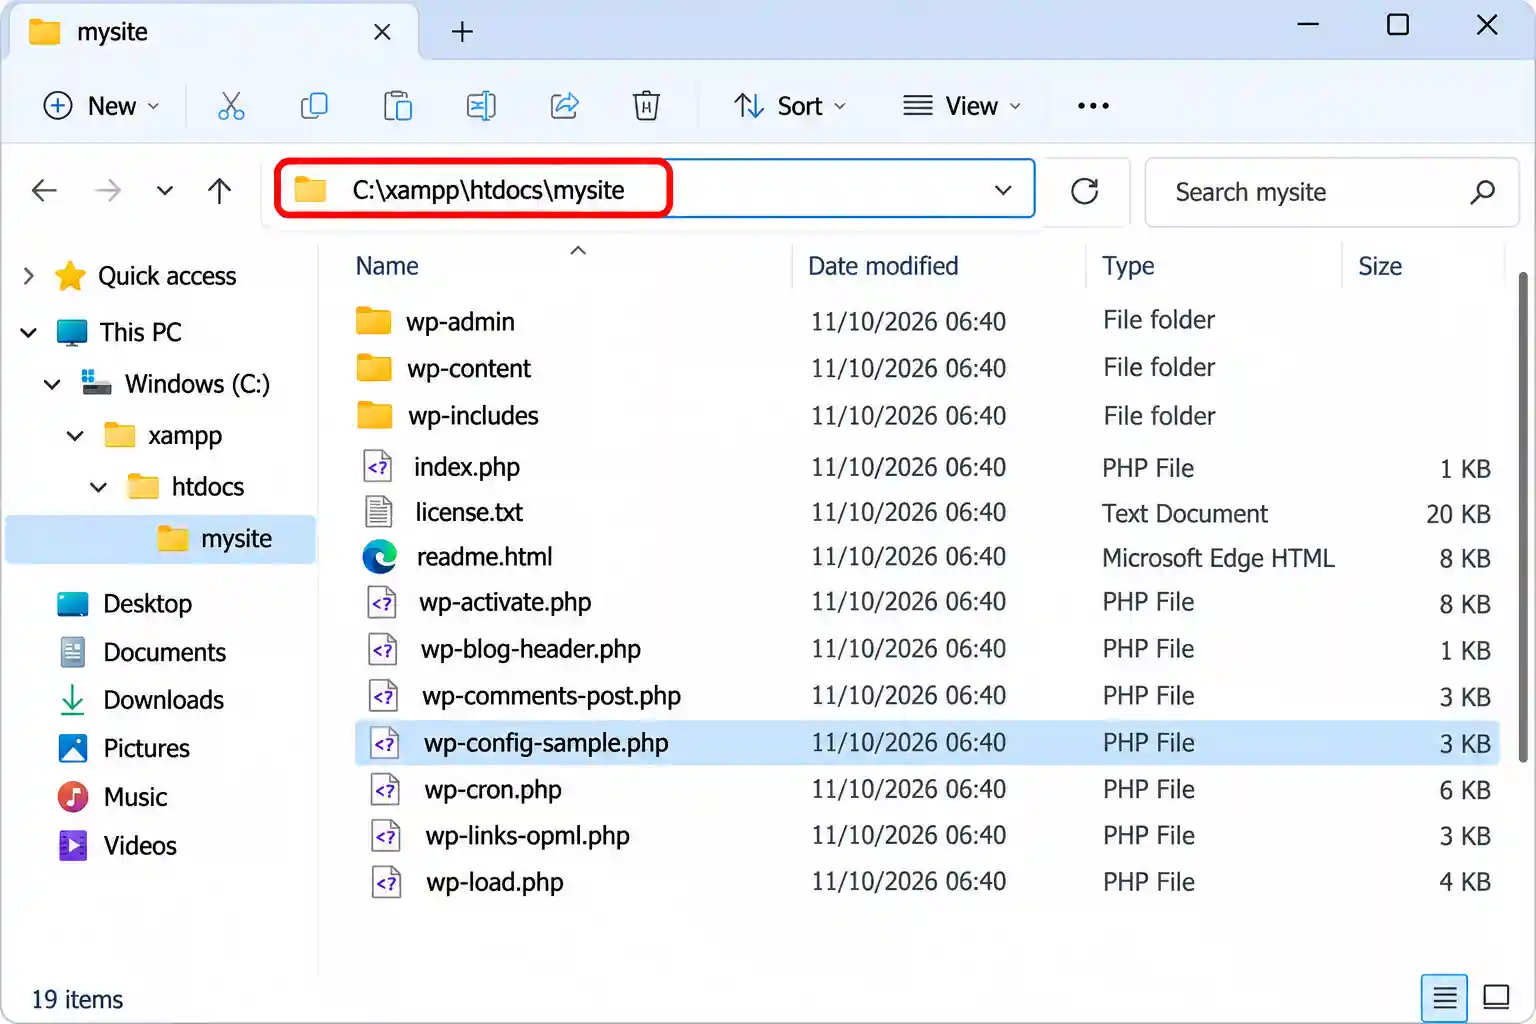
Extract the .zip into C:\xampp\htdocs\. The archive contains a single folder named wordpress. Rename it to your project name, for example mysite.
htdocs is Apache's web root: anything inside it is served at http://localhost/. That is why the folder name becomes part of your site's address, so C:\xampp\htdocs\mysite is reached at http://localhost/mysite.
Naming tip
Use lowercase letters, no accents, and no spaces (use a hyphen if you need a separator). The name is stored inside WordPress as part of the site URL, and awkward characters cause trouble later.
After renaming, the folder structure should look like this. If you see wordpress nested inside mysite, you extracted one level too deep.
C:\xampp\htdocs\mysite\
├── wp-admin\
├── wp-content\
├── wp-includes\
├── index.php
├── wp-config-sample.php
└── ...
On macOS the web root is /Applications/XAMPP/xamppfiles/htdocs, and on Linux it is /opt/lampp/htdocs. The remaining steps are identical.
Step 4: Create a Database in phpMyAdmin
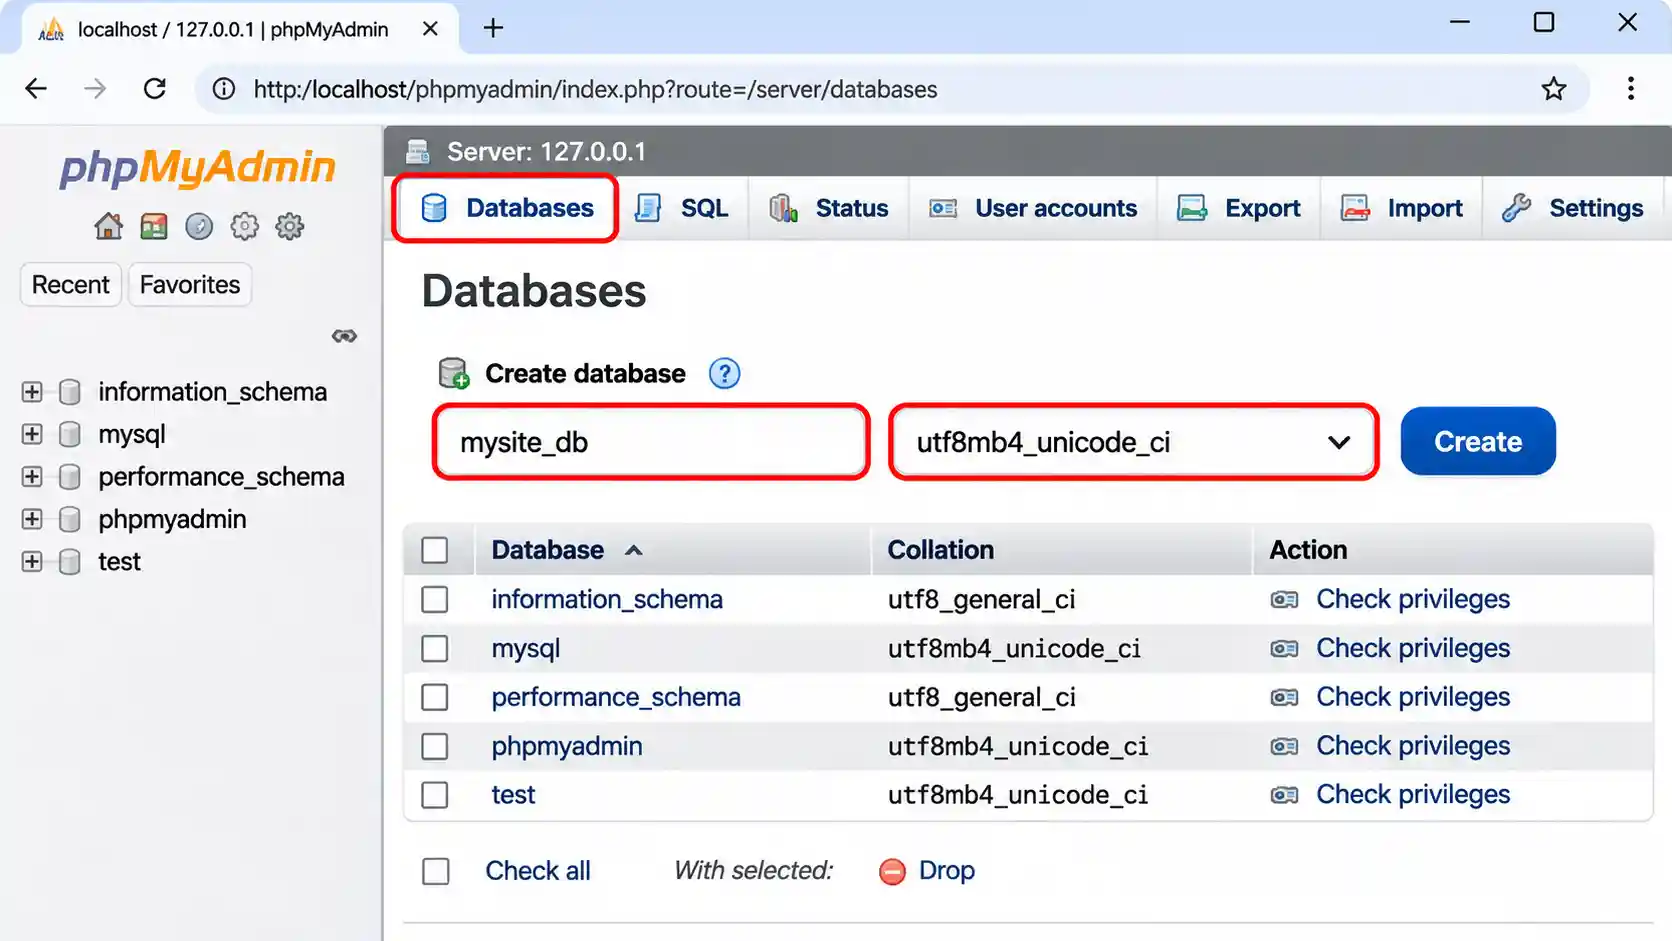
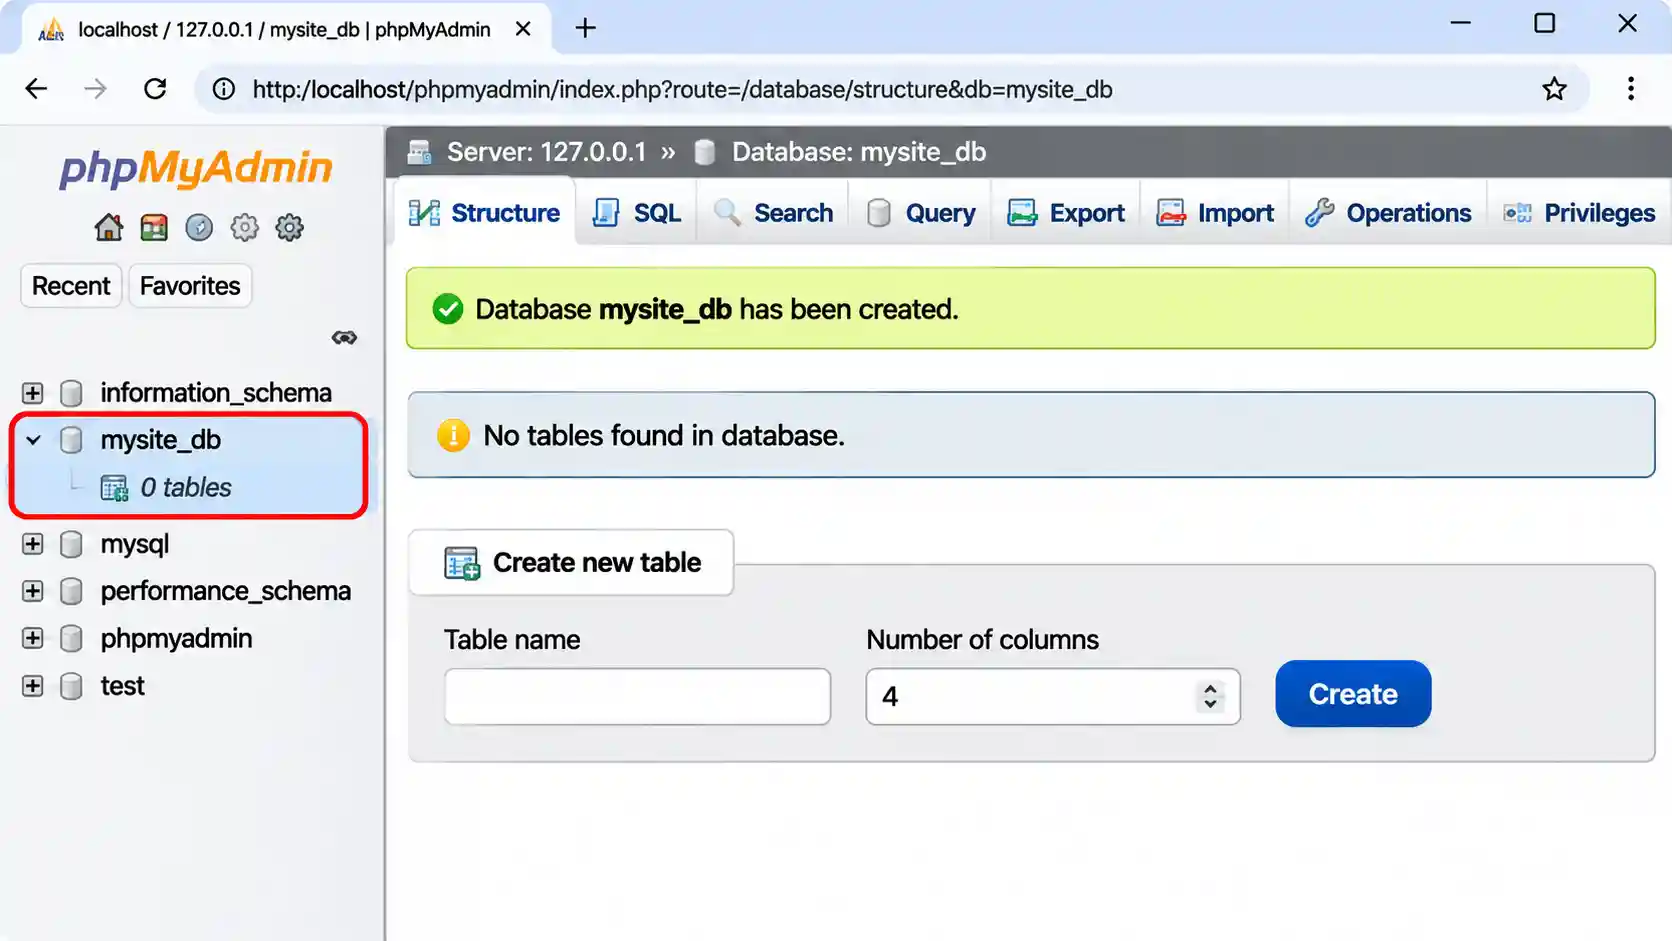
WordPress stores everything in a database, and it will not create one for you. Open http://localhost/phpmyadmin, click the Databases tab, and fill in:
- Database name:
mysite_db(letters, numbers, and underscores only) - Collation:
utf8mb4_unicode_ci
Click Create. The utf8mb4 character set supports the full Unicode range, including emoji and non-Latin languages, and it is the character set WordPress uses by default for new installs.
Step 5: Run the WordPress Installer
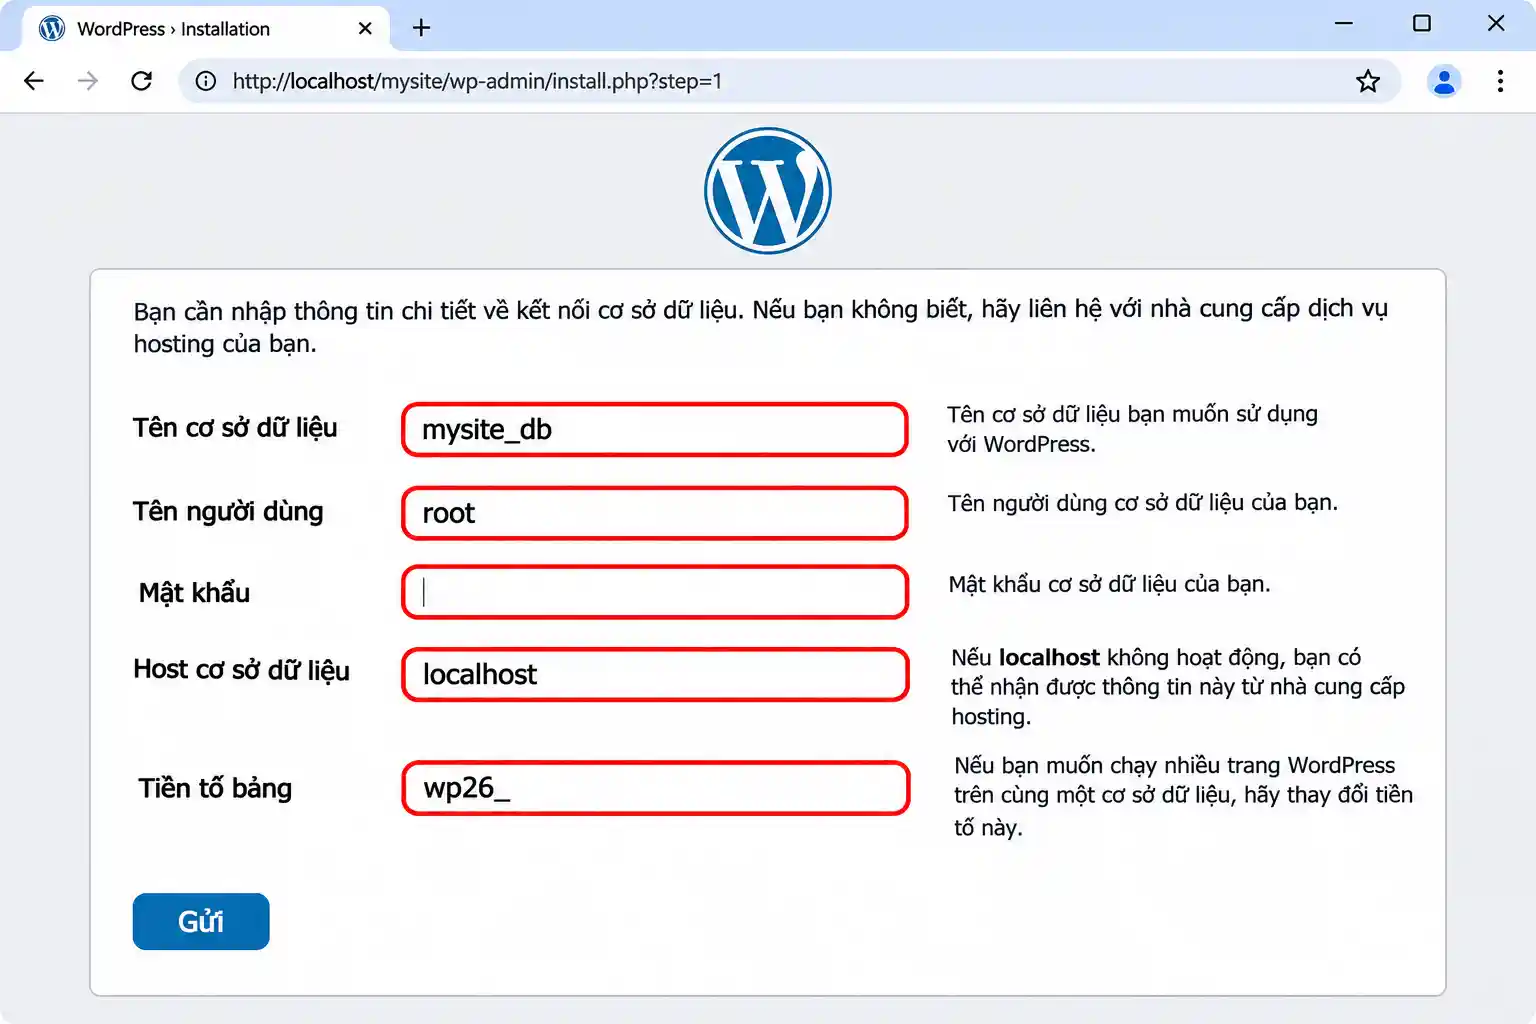
Open http://localhost/mysite in your browser. Choose your language, then enter the database details below. These values are for a local XAMPP setup only.
| Field | What to enter | Why |
|---|---|---|
| Database Name | mysite_db | Must match the database you created in Step 4 exactly. |
| Username | root | The default MySQL admin account in XAMPP. |
| Password | Leave blank | XAMPP's root account has no password by default. Never use an empty root password on a live server. |
| Database Host | localhost | MySQL runs on your own computer. |
| Table Prefix | Change wp_ to something like wp7k_ | A minor hardening habit worth building before you go live. It is not a security guarantee on its own. |
Click Submit. If WordPress confirms it can talk to the database, click Run the installation.
Step 6: Set Up Your Site and Admin Account
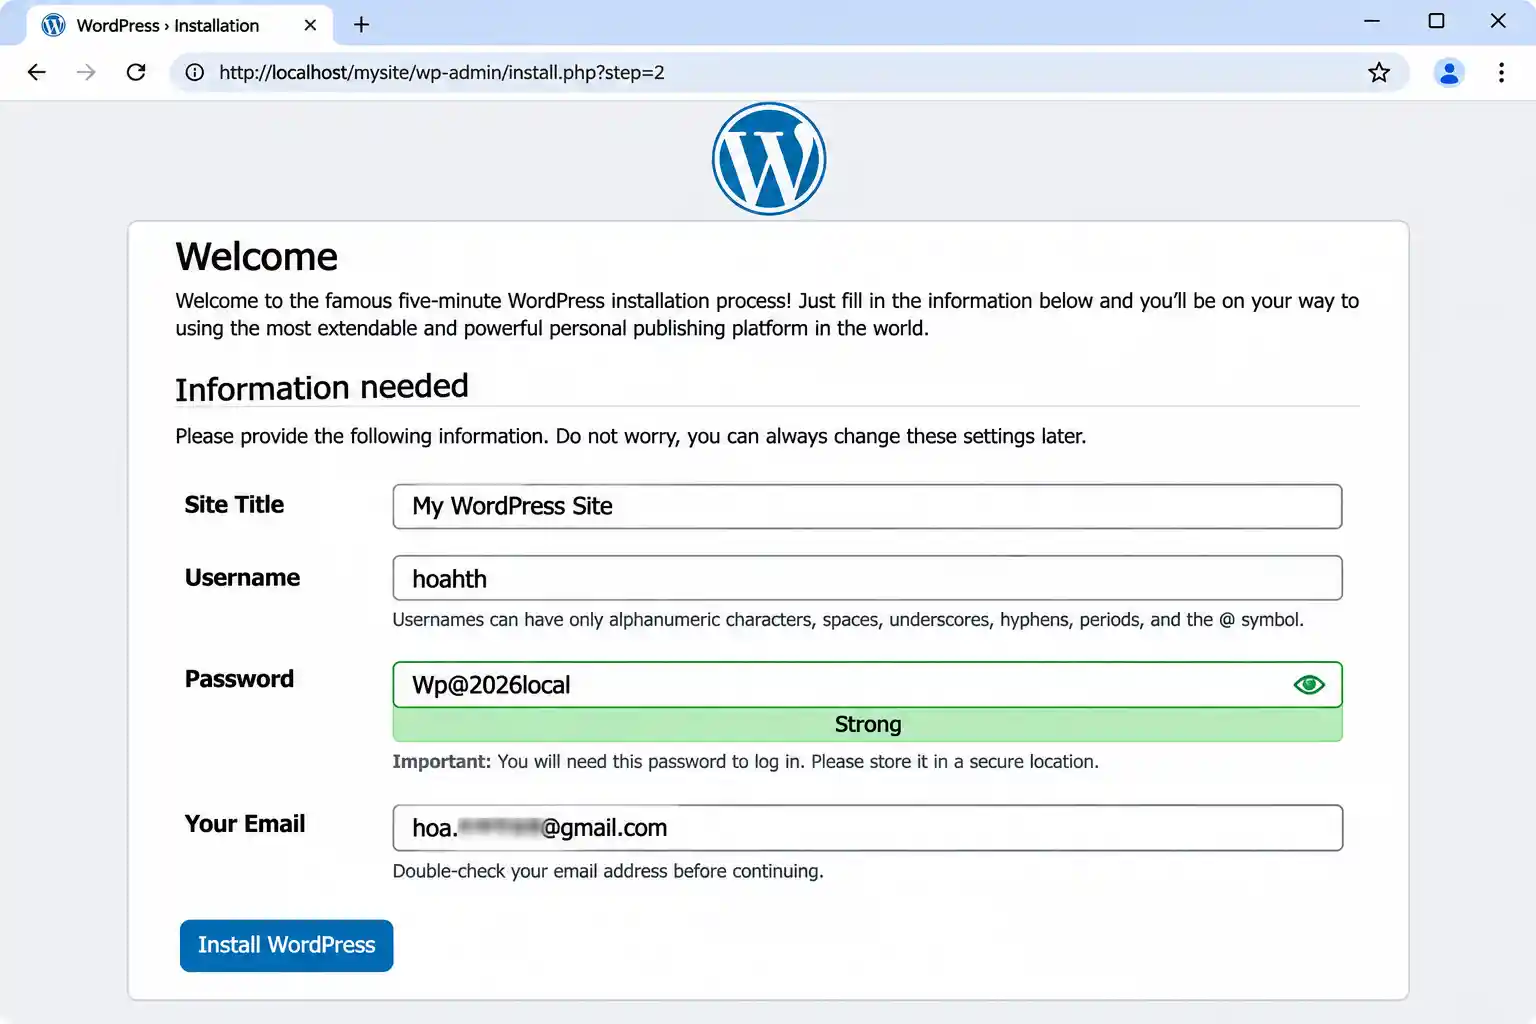
Fill in the site details:
- Site Title: anything you like, you can change it later.
- Username: avoid
admin, even locally. It is an easy habit to carry over to a live site, andadminis the first name attackers try. - Password: keep the generated strong password or set your own, and save it in a password manager.
- Email: your real address, so password resets work later.
- Search engine visibility: on localhost it makes no difference because nobody can reach the site. Just remember that when you move the site to a live server, this box must be unchecked in Settings → Reading, or search engines will not index your site.
Click Install WordPress.
Step 7: Log In to the WordPress Dashboard
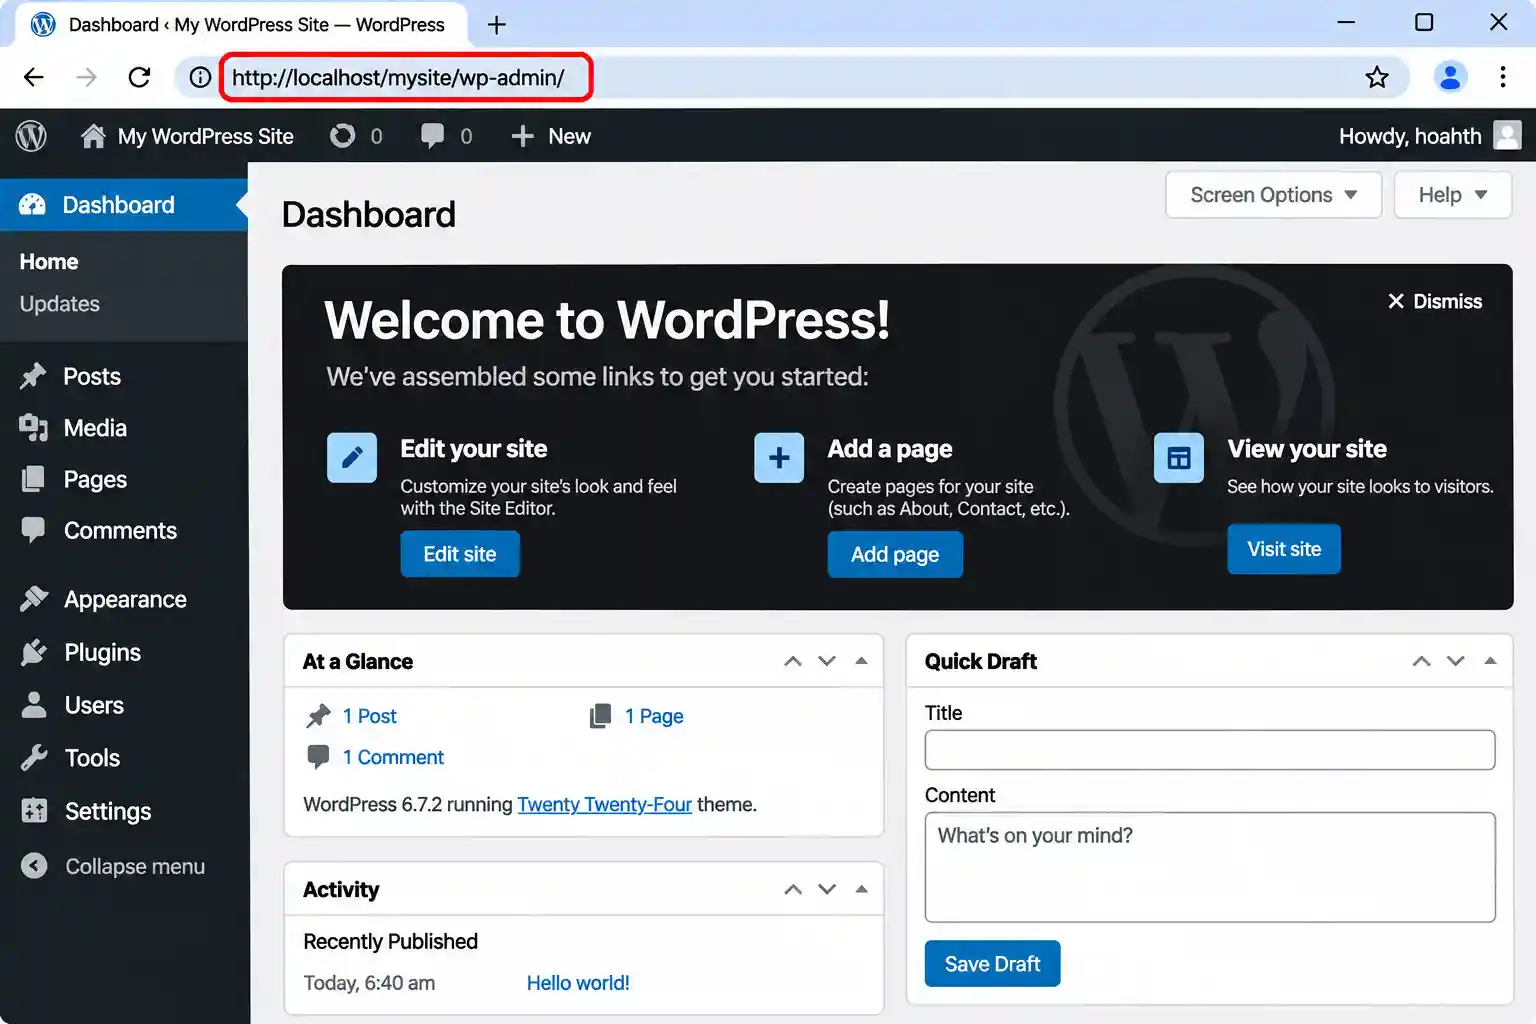
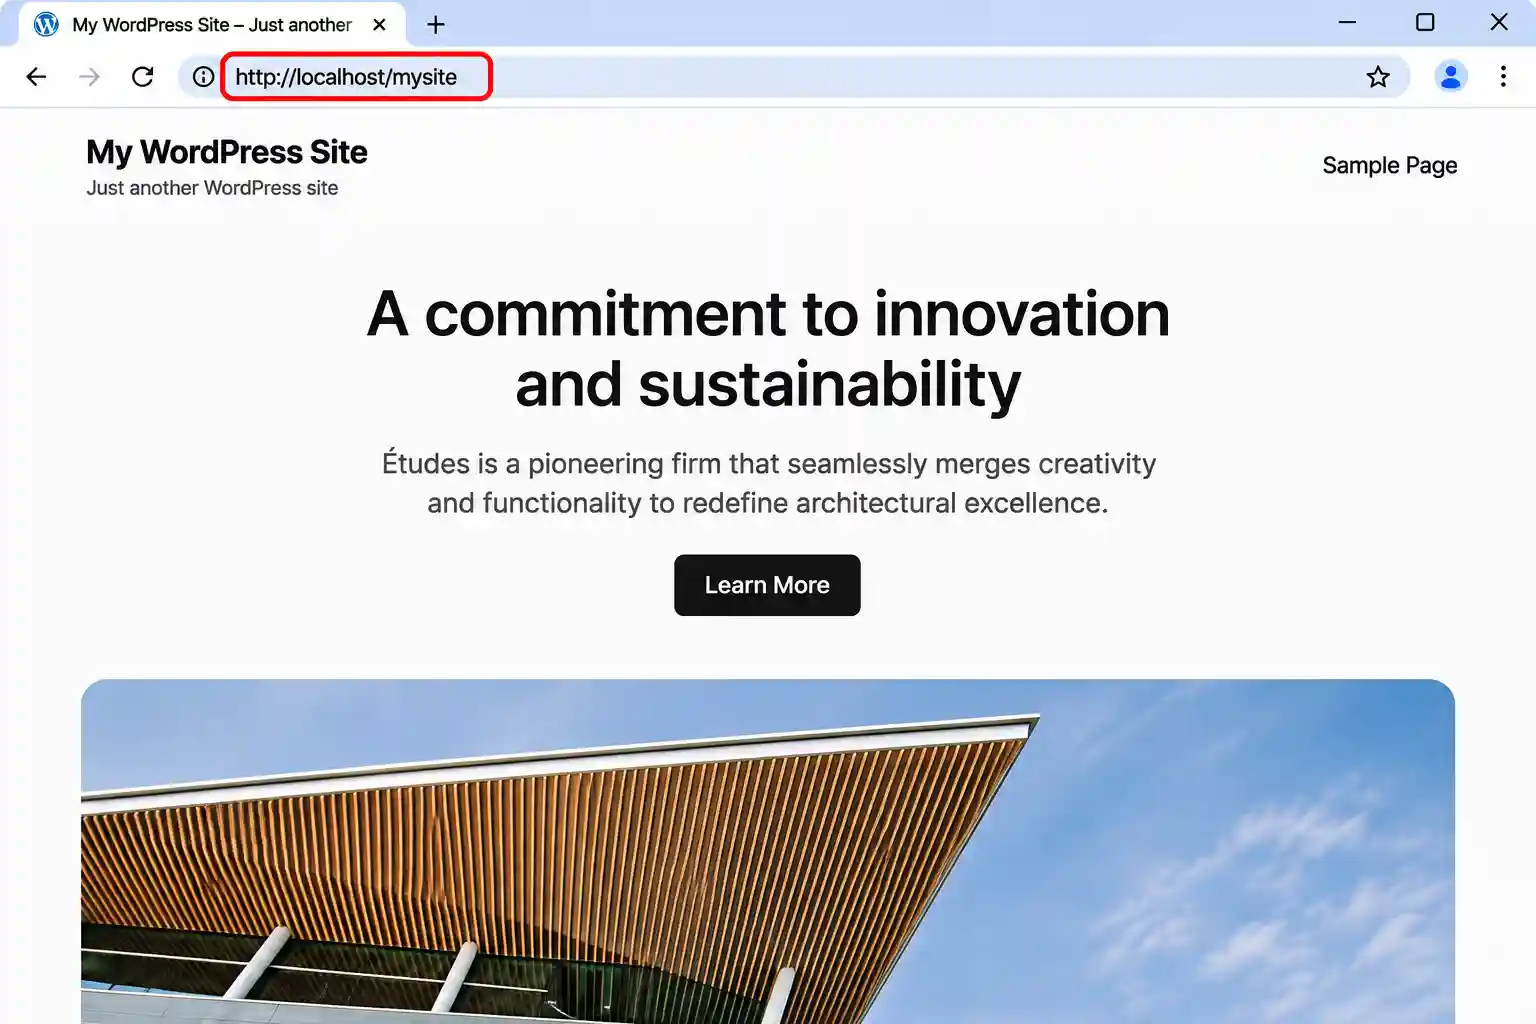
Go to http://localhost/mysite/wp-admin and log in with the account you just created. Your front-end site is at http://localhost/mysite.
| Menu | What it is for |
|---|---|
| Posts | Blog articles and news. |
| Pages | Static content such as About or Contact. |
| Plugins | Install, activate, and remove add-ons. |
| Appearance | Themes, menus, and the site editor. |
| Settings | Site-wide options, including Permalinks. |
Alternative: Create the wp-config.php File Manually
If the installer cannot write wp-config.php on its own, create it by hand:
- In
C:\xampp\htdocs\mysite, renamewp-config-sample.phptowp-config.php. - Open it in a code editor and set the four database constants:
define( 'DB_NAME', 'mysite_db' );
define( 'DB_USER', 'root' );
define( 'DB_PASSWORD', '' );
define( 'DB_HOST', 'localhost' );- Replace the placeholder authentication keys and salts with fresh ones from the official generator at
https://api.wordpress.org/secret-key/1.1/salt/. - Save the file and open
http://localhost/mysite. WordPress skips the database screen and goes straight to the site setup form (Step 6).
What Settings Should You Change After Installing WordPress on XAMPP?
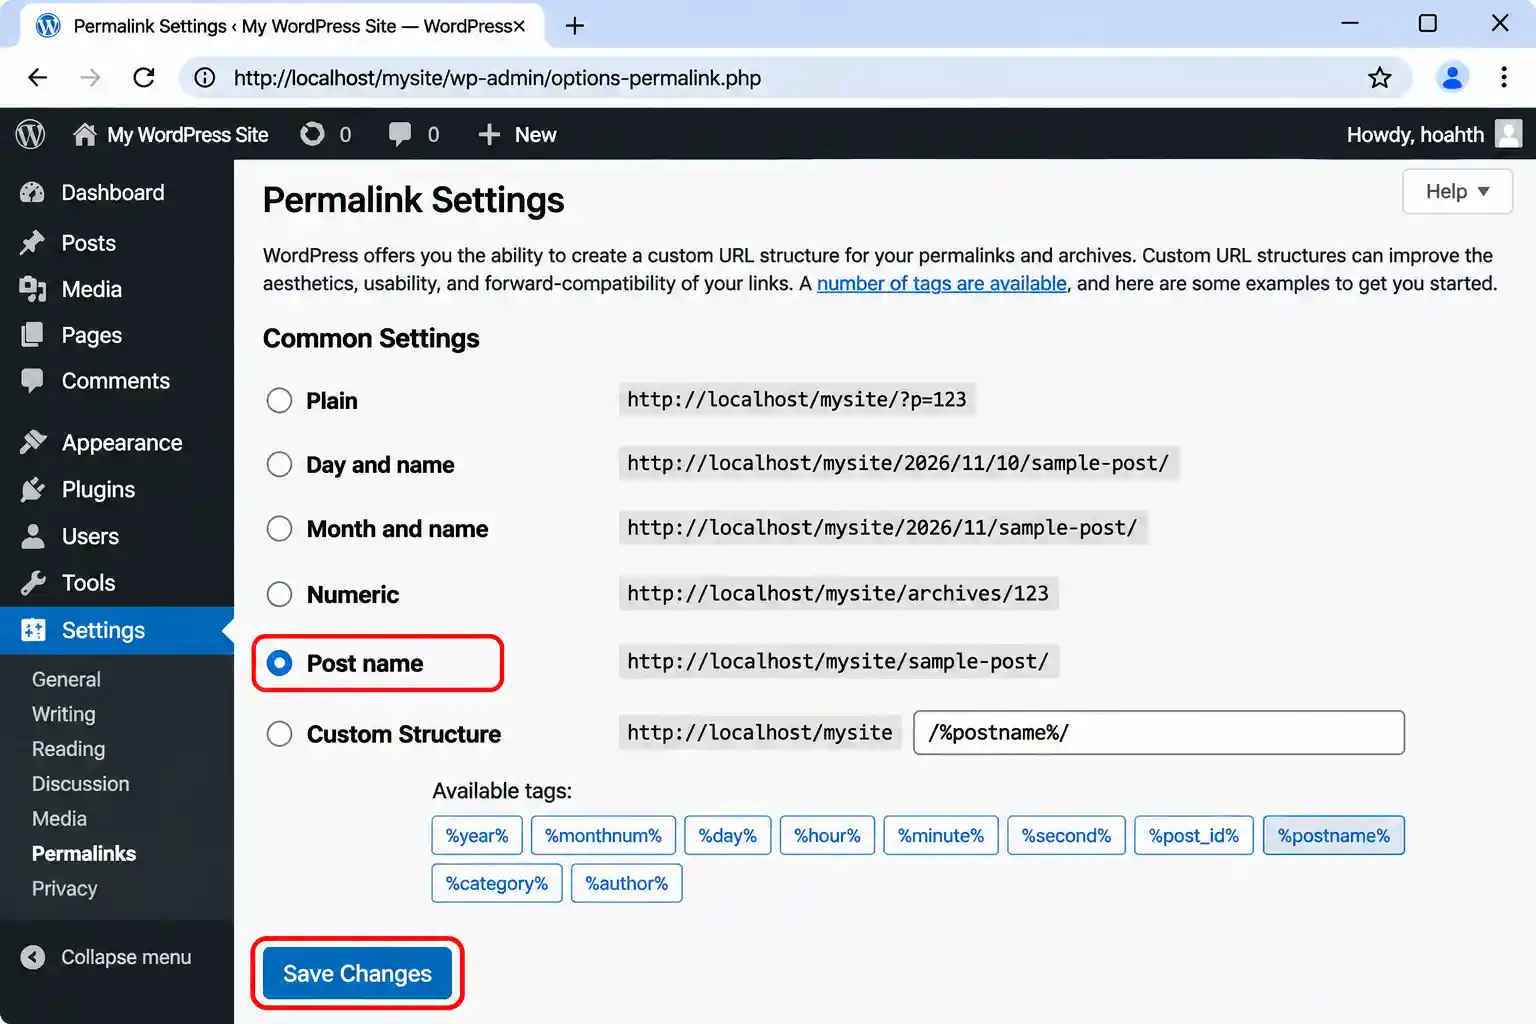
- Permalinks. Go to Settings → Permalinks and choose Post name for clean URLs. If pages return a 404 afterwards, see the troubleshooting table below.
- Upload limit. Large themes and plugins can exceed the default limit. Edit
C:\xampp\php\php.ini, raiseupload_max_filesizeandpost_max_size(for example to128M), then restart Apache. - Debug mode. While developing, add the lines below to
wp-config.phpabove the "stop editing" comment, and remove them before the site goes live. - Speed. A slow local site is usually a configuration issue. See how to speed up localhost performance on Windows.
define( 'WP_DEBUG', true );
define( 'WP_DEBUG_LOG', true );
define( 'WP_DEBUG_DISPLAY', false );
With these settings, errors are written to wp-content/debug.log instead of appearing on screen.
What Are the Most Common Errors When Installing WordPress on XAMPP?
| Problem | Likely cause | Fix |
|---|---|---|
| "Error establishing a database connection" | MySQL is stopped, or the database name, user, or password does not match. | Start MySQL in the Control Panel. Check the four DB_* values in wp-config.php against phpMyAdmin. If you set a root password, enter it in DB_PASSWORD. |
http://localhost/mysite will not open |
Apache is stopped, the folder name is misspelled, or Apache runs on another port. | Start Apache, confirm the folder name in htdocs matches the URL, and try http://localhost:8080/mysite if you changed the port. |
| Permalinks return a 404 | mod_rewrite is disabled, or .htaccess is not allowed or not writable. |
In C:\xampp\apache\conf\httpd.conf, make sure LoadModule rewrite_module is not commented out and the htdocs directory has AllowOverride All. Restart Apache, then re-save Settings → Permalinks. |
| Upload exceeds the maximum size | PHP's default upload limits are low. | Raise upload_max_filesize and post_max_size in php.ini, then restart Apache. |
| Blank white screen | A PHP error in a plugin or theme, hidden because display of errors is off. | Turn on WP_DEBUG_LOG and read wp-content/debug.log. To rule out a plugin, rename wp-content/plugins to plugins.off, reload, then rename it back. |
| Emails fail to send | XAMPP has no mail server configured by default. | Safe to ignore on localhost. It does not affect development, and you can add an SMTP plugin later if you need to test emails. |
For Apache and MySQL startup problems, see 9 common XAMPP errors on Windows and how to fix them. If MySQL rejects your login, try our guide to resetting the MySQL root password in XAMPP.
How Do You Install Multiple WordPress Sites on XAMPP?
Each site needs its own folder in htdocs and its own database. Repeat Steps 3 to 7 for every new site:
| Site | Folder | Database | URL |
|---|---|---|---|
| Site 1 | C:\xampp\htdocs\site1 | site1_db | http://localhost/site1 |
| Site 2 | C:\xampp\htdocs\site2 | site2_db | http://localhost/site2 |
For cleaner addresses like site1.test, set up virtual hosts. Our guide on setting up virtual hosts in XAMPP on Windows walks through it.
🧯 Common Mistakes to Avoid
- Extracting one folder too deep, which gives you
htdocs\mysite\wordpressand a site atlocalhost/mysite/wordpress. - Using spaces, capitals, or accents in the folder name. The name becomes your URL.
- Starting Apache but forgetting MySQL. The installer will report a database connection error.
- Typing a different database name in the installer than the one created in phpMyAdmin.
- Installing nulled themes or plugins. Free copies of premium products are a well-known malware route, even on localhost.
- Moving the site to live by copying the folder only. The database must be exported too, and every
http://localhost/mysiteaddress inside it must be replaced with your live domain. - Leaving
WP_DEBUGon after the site goes live.
❓ Frequently Asked Questions
Can I install WordPress on XAMPP for free?
Yes. WordPress and XAMPP are both free, open-source software, and a local install needs no hosting account or domain name. You only pay later if you move the site to live hosting or buy premium themes and plugins.
What is the default MySQL password in XAMPP?
The default MySQL root user has no password, so leave the password field blank in the WordPress installer. That is acceptable on a private local machine only. To add one, follow our root password guide, then update DB_PASSWORD in wp-config.php.
Where do I put WordPress files in XAMPP?
Extract them into C:\xampp\htdocs, in their own subfolder such as C:\xampp\htdocs\mysite. XAMPP serves everything inside htdocs at http://localhost/, so this folder becomes http://localhost/mysite. Files outside htdocs will not load.
Can I move my XAMPP WordPress site to a live server?
Yes, but copying the folder alone is not enough. Export the database from phpMyAdmin, upload the files to your host, import the database, update wp-config.php with the new credentials, and replace http://localhost/mysite with your live domain. A migration plugin can automate most of this.
How do I install a second WordPress site on XAMPP?
Create a second folder in htdocs (for example site2) and a separate database (site2_db) in phpMyAdmin. Then open http://localhost/site2 and run the installer again with the new database name. Each site needs its own folder and its own database.
Is XAMPP or Laragon better for WordPress?
It depends on your workflow. XAMPP gives you a standard Apache, MySQL, and PHP stack with a few manual steps. Laragon speeds up repeat setups with quick app creation and automatic .test domains. Compare more options in our 9 best local web development environments.
➡️ What's Next
- Install a theme and a few plugins and test them on your new site.
- Give each project a clean
.testaddress with virtual hosts in XAMPP. - Prefer a faster workflow? Read how to install Laragon on a Windows PC.
- Building with Joomla as well? See how to install Joomla 6 on a Windows PC.
- Ready to publish? Plan your move from localhost to live hosting: export the database, upload the files, and replace the localhost URLs.
✅ Last verified on WordPress 7.1 with XAMPP v3.3.0 — November 2026

Stephen
CEO, Founder & Joomla Product Creator
Stephen is the CEO and Founder of Jlvextension, known for creating high-quality Joomla templates and leading the development of innovative web solutions.